Showing posts with label vintage. Show all posts

Thursday, November 15, 2018

Ups and Downs on the Upcycling

I have not made much progress on getting a clear idea for my Upcycle entry... I have been playing with some possible materials.  The old quilt top that I featured in my last post is out of the running.  I want to show off my hand dyed upcycled textiles, so the base is going to be a dyed damask tablecloth.  There are so many possibilities for this theme.  My vast stash of vintage textiles includes men's ties that are intended for a wearable project, but there are many of them.  I could use some of them with other pieces of old clothing in a collage

Of course, I have many dyed doilies which I have fun using to create texture in a piece.  Too many of them might look too antique, too stale for the art gallery patron.  I need to think about making something more edgy and unexpected.


Along with dyeing fabric for resale and my own creations, I often throw a few pairs of socks in the dye buckets.  Some of them are starting to wear out, but they are too beautiful to toss in the trash. 

A while ago, I found instructions for making sock dolls.  Since then, I have wanted to make a wall hanging with a whole bunch of wildly embellished sock dolls.  Maybe it is time to pursue that idea.


Tuesday, November 6, 2018

Contemplating an Upcycling Project

One of SAQA's upcoming calls for entry is "Upcycle!"  Since I have gotten my start in the fabric and art quilt business by upcycling vintage textiles, this is a must-do opportunity for me.  I am also planning an entry in their 3D Expression show, that entry deadline is earlier that Upcycle, but I am pressuring myself to have solid ideas for both by the end of November in order to complete them in time to submit my entries.

Here is my first thought for Upcycle:


This is a vintage quilt, about 70 x 80,'" in very rough shape.  It would be a base, a jumping off point for a fabric collage.  I am envisioning lots of hand stitching, overlays of images on sheer fabrics, some painting on fabric too.

The rips and tears indicate that it sure has seen a lot of use in its life.  Hopefully, it was loved in its early life, but is has likely been through some rough handing.  The quality of the hand stitching holding it together hasn't helped it much, but I commend this quilt's maker for sticking with it and finishing it.  We all have to start somewhere.

Here is something that will horrify vintage quilt collectors - I admit, I ran this quilt through the washing machine a few days ago!  Yes, I know I am not supposed to do that to an old quilt, but I had to in this case.  I had a mouse problem on Saturday, and the little bugger holed up in this quilt.  Being terrified by hot pursuit of my cat, the uninvited mouse left copious... deposits.  I had to wash it.  There is no way I am going be wrapped up in a quilt this large, hand stitching it with mouse turds all over it.  I am pleased to report that in its already fragile state, the washing machine really didn't do any more damage.   A little bit of the batting came out from the larger holes, but that's it.  I don't think that any of the tears were made worse.  I'd rather risk the damage than have the risk of who knows what the mouse could have been carrying.

Next time, a few more Upcycle candidates.

Tuesday, October 30, 2018

Sewing Machine Spirits

I have made it well known that I use mostly vintage sewing machines.  These machines have had other owners and therefore unknown stories.  There are days where I really believe that inanimate objects can have spirits in them.  This past Saturday, I was rolling along with making last minute projects for an upcoming art fair.  All day, my sturdy Singer 503 was getting the brunt of the work. 


Very suddenly in the early evening, it decided to go on strike!  I truly thought the thing was dying - the motor slowed to a crawl, it wouldn't wind a bobbin properly, the thread tension went haywire.  All the usual troubleshooting  - oil, new needle, re-thread (multiple times) - failed.  I called it quits for the night after spending an hour and a half trying to tinker with it.  I even switched foot pedals, without improvement.  The next day, I headed to my sewing room to make more stuff, and started with a test sew-off on the ailing 503.  The machine ran beautifully!  All was well again in Rags Paper Stitches land.  Those old machines don't seem to get that hot, but perhaps the motor temperature got above a critical point.

While I am going on about my 503, here are some neat pieces of Singer ephemera relating to the 503 and its close cousins, the 500, and the 400 series.  These items are from 1962 and 1963, when Singer was rolling out their built in zig-zag mechanism and the slant needle configuration.  Enjoy!
 A promotional booklet showcasing all the decorative sewing that could be done with a zig zag machine
 Introducing the Slant-O-Matics!

 Freebie give-away hand sewing needle packs advertising the 401.

Freebie mending kits touting the Slant-O-Matics as the "greatest sewing machine ever built."  I beg to differ with that, even some of Singer's earlier models, while not zig-zag, were far better.  I love the slant needle configuration, but the 400s and 500s are not as strong and robust as others (201 and 15-91...).  Not to mention the motors in mine sound downright awful.

Thursday, October 11, 2018

Another Vintage Sewing Machine

Here it is - a Singer 15-91:


The cabinet is in rough shape.  I've seen worse, but have a better one in need of a machine (not the same style though).  I have little interest in, and no time to embark on a furniture restoration project.  All the same, I'd rather not junk what could be a nice cabinet.  I am not a fan of repainting these, but in cases like this, it needs help.  I'd rather see someone restore it to its original varnish, not painting it in chalk paint!

The machine is in excellent condition cosmetically - the decals are just about perfect.  I have not tried to run it yet, I'll probably try it out next week when things slow down a bit.

Wednesday, February 28, 2018

A Little Progress

Aside from spring planting and fall harvest, nothing gets me off track more than packing for a quilt show.  I have not accomplished much on the samples for the demos I will be doing this weekend, but I have enough done to show the samples.
Image and design copyright RPS
This is part of a collage that I am doing on a vintage tea towel.  Take a look at the feather stitch I used to stitch a length of silk sari ribbon around a square cut from a vintage hankie.

Image and design copyright RPS
This is a bigger view of the above detail.  The piece above the hankie is a mini collage that I started as another project that stalled, so it is going into this tea towel creation.  I am feeding my fascination with layers upon layers with this piece.

Not my stitching here!  This was the stitching on the tea towel when I rescued it in an auction box lot.

Finally, a little stitching I managed to finish on one of the collages that I will be talking about in Lebanon, Ohio this weekend.

Tuesday, February 13, 2018

Collage with Vintage Textiles

I'll be giving a short demo each day of the upcoming Lebanon, Ohio quilt show on creating a unique fabric collage with vintage fabric and fancy pieces.

This is a finished collage, a very simple composition made from a fancy hankie, a hand dyed damask napkin, vintage ties and some pieces of my "scrap-lace" fabric technique.
Image and design copyright RPS

Over the next couple of weeks,  I will be working on a few more collages to showcase the items I sell at the quilt shows.  I'll post the progress here as they come together leading up to the show on the first weekend of March.  Here's the start I have on the two I will concentrating on:
Image and design copyright RPS

Check back Thursday to see my next steps on these.

Thursday, December 21, 2017

One Dollar, Unlimited Inspiration

Not having learned traditional quilting means that I have no qualms about doing somewhat unorthodox things to fabric.  I have recently amassed a collection of new rubber stamps for my art journaling class supply base.  Why use them just on paper?  I have already used them on my "What's Your Story" challenge entry in the Mutton Hill Quilt Show:


Since I was stamping on the quilt after putting all three layers together, I had a lot of ink "over-slop."  The stamps sunk into the soft surface and left the excess ink that was picked up.  I probably over inked the stamps too, but everything remained legible.  I'm fine with that.


I am still adding to my collection of alphabet stamps, I just bought a vintage set of them at the local junk auction for $1. 


I should have sorted through them before the auction started, as a few letters are missing.  No problem, I could just mix fonts in a sort of ransom note style.  Then, there is always Ebay; I found a probably identical set of stamps, complete.  This second set is already on its way to me.  I will keep and use both sets, of course.

Thursday, November 30, 2017

Odd and Ends

Oh my, there really is a random acts of art movement!  I mentioned the concept in my last post, not knowing that this was a "thing."  Even though I'd love to sell my work (I need the money!), I really like the idea of encouraging future artists and collectors by leaving original art trading cards, postcards or bookmarks for others to find. 

Earlier this week, I had a great time with my art journaling group, making artist trading cards.  Enough cards were made so that we all had a card from everyone else.  The group is continuing, but is was a nice way to have a memento from each participant.  I love the cards I that received, and will always treasure them.  This has been my first real stint at teaching, and I think that is has gone well.  I have learned just as much as the rest of the group, and I am pleased that we are inspiring each other.

Going off in another direction, I had some more auction success this past weekend:

Yes, I have a problem with fancy hankies!  This is part of a bunch of 311 vintage hankies that I bought.  Most of them will go into the resale stash, but I am going to make things with them too.  I have to have samples of projects for the stuff I sell.  These are too pretty to keep hidden in boxes and dresser drawers.  This winter I will be making several fabric collages with hankies.  Keep checking back for my progress...

Wednesday, October 11, 2017

Auction Finds

I had a good day at the local junk auction this week.  I came home with three sewing machines, though not anything greatly desirable.  These machines are robust but lower end models, not the machines that I look for as a collector who uses her collection.  This bunch will be serviced and donated to a group that works with abused and homeless girls.  The girls are taught sewing as a part of a therapy course, and each girl gets to keep the machine that she learns on.  I’m all for any program that gets any youngsters into making something.


I also bought this:

An unfinished hand sewn quilt top made with lots of different strips of 1930s printed feed sack cloth.  As much as I rant against looking at the backs of contemporary quilts, I must say, this one warrants study of the back.


The underside is a collection of more print scraps, and plain feed sacks.  This quilt top begs so many questions.  The obvious, who made it, and where?  Why was so much time spent on what is here, to leave it unfinished?  It also came with several loose stars, and two quarter stars.  Those little pieces will go into a collage.  I want to do something with the part top that preserves its integrity, but I have no desire to attempt to continue the pattern.


Tuesday, August 22, 2017

Latest Adventures

August is almost over, another month of neglecting this blog.  I have had success in other areas, take a look at the most recent batch of fabric I have dyed:


The bottom image is a mass of varied fabrics in a discontinued Procion color called Tea Leaves.  I really wish that it was still available.  It is a rather unstable color, prone to separation and inconsistent color across different fabrics, but that is exactly why I love it!  I don't have to tinker with it so much to get the variety that I desire.

The Coshocton Canal Quilters' show was a modest success for me as a vendor.  They have a nice new venue for the show, I will definitely be back there next year.


As always, thank you to those of you who made purchases, and I appreciate all the input on my fabric, quilts and ideas.  I am always looking to add things and improve.  I am delighted at the demand for vintage things... I'm searching for wooden ironing boards to have at the last two shows for the year!

In an attempt to get back to posting here regularly, I am trying something new: posting again two days a week, but I am only going to give myself fifteen minutes on each post day to get this out.  If carving out creative time each day is a challenge for you, I'm right there with you!  There is so much demanding our attention, and we must make time for things.  It is not easy!  I consider this blog to be a part of my creative efforts, and I have been getting overwhelmed by dreaming up posts that are far too heavy for all that I need to do in a reasonable amount of time.  I must remind myself to keep this as a light journal of my creative adventures, not a chapter in an art history book!

Thursday, May 11, 2017

Trick or Treat!

I know it is not Halloween time, but I found a surprise "treat" recently.  I'm working on a chicken themed quilt, and I was going to cut into one of my vintage livestock feed bags for it.  This is the bag I selected:


I noticed some traces of faded post-manufacture writing on the bag, and by chance I looked inside the bag...


Some ambitious youth had made the feedsack into a trick-or-treat bag!  I am so amused by this, that I am thinking of making this a whole cloth quilt, and not using it for the chicken project.  I might just split the bag, and turn the "fill'er up" side out, pairing it with the remaining "right" side for a quilt top.  I would stitch the letters to make them show up better, and perhaps add color to the faded printing.  I'm not sure what else yet, but I will come up with something more to do with it.

What I would love to know (and sadly never will), is where the kid who used this as a trick-or-treat bag lived.  It is a large bag, it once held 100 pounds of feed.  I'm assuming he (this must be the work of a teenage boy) lived in a rural area to have access to chicken feed bags, but in a rural area, population is sparse, houses are far apart...  slim chance of filling a bag this size with candy.  Perhaps he was traveling to a city with visions of lots of candy.  I give him credit for dreaming big!


Thursday, September 15, 2016

More Cigarette Silks

In an earlier post this year, I lamented the lack of cigarette silks in my collection of vintage textiles.  I have corrected that now, with this recent antiques mall find:
This is an unfinished project, done in the crazy quilt assembly style.  Most of the pieces are true cigarette silks, printed with flags of various nations.  The silks are larger than the two that I have already, these are about 3 X 4".  Two pieces are commemorative ribbons from social club events with a European ancestry requirement.  These identical ribbons are dated 1927, and I have no idea yet what language they are imprinted with... will have to investigate "Kesajuhlet."  The world of old social clubs and secret societies is a whole areal of study on their own, a fascinating study.... for someone else!

The silks are machine sewn to a piece of muslin backing, then lengths of satin ribbon were machine sewn over the seams,  The maker hand stitched over almost all of the ribbon with a herringbone stitch.  What I want to know (and never will) is why the yellow herringbone stitching on the top horizontal row stops half way across, and why four of the silks are upside down.

What is fun for me is making connections with these vintage objects,  I'll never know the maker or the answers to the above questions, but I am certain that the hand stitches are done in Glossilla Rope embroidery cording ("Brighter than Silk").  I found a stash of new-old-stock Glossilla at a recent quilt show:
I have found it to be impossible to pull through regular cotton fabric, but it works well for couching or for the weaving thread in whipped and threaded back and running stitches.  Someday soon I will try it through silk.


Tuesday, September 6, 2016

More Auction Treasures

If you are looking for creative inspiration, there is so much in your own community.  This past weekend for me was chock full of local history.  I attended an estate sale and an estate auction and came away with more knowledge of the area I now call home and some great future art project ideas. 
                                      
The first sale yielded a small collection of gravestone rubbing how-to books and supplies, among other items.  Old cemeteries are a great source for local history and genealogy, and potential places to observe folk art stone carving.  I have already been well acquainted with incorporating gravestone carving into my own art, first in ceramics, and now making crayon rubbings on fabric.  This is a printed vintage tablecloth, pulled out of the weekly junk auction, covered in a collage of gravestone rubbings:
Image copyright RPS, please do not pin or re-post

The auction was the estate of a couple who had printed the town newspaper for decades.  There were a few rare local history books; I was soundly outbid on one lot of the books, but I bought the second lot, and I am dutifully studying them.  Half of the auction was the contents of the house, the other half was the bulk of the printing items.  The newspaper was apparently printed in a shed at the back of the property.  A calendar from 1974 in the shed had a note on December 26 that read, “Last day of Home Towner.”  After the printing of that last newspaper, the owner must have locked the shed and left it.  I bought a boxful of copies of two local history booklets that had been printed there and were authored by the couple.  There were lots and lots of old metal printing blocks for advertising, all of them went out of my price range.  I would have liked to get a few for display and to have something from this piece of area history.  I didn’t want to bid too much on them, as the metal plates were too shallow to use for rubbings, and I don’t want to get into messy printing inks.  I’m more interested in things that I can use rather than just look at these days.

There were several boxes of 9 X 12” sheets of embossed advertising graphics.  They were embossed in a positive orientation, which made them good for rubbings, if the fine detail could be captured.
Image copyright RPS, please do not pin or re-post


 I decided to take a chance on them.  Luckily, no one else wanted them, I and have two large boxes full of the sheets and a boxful of the monthly catalogs for the ad sheets from the manufacturer.  The ad sheets I now have are from the mid to late 1960s.

I have not been able to find much about these ad sheets.  All I have found so far is from an Ebay listing  from seller BenningtonBargains: “In the days of hot type, advertisers would send these mats to newspapers who would pour lead into them and then use the lead plate on presses to print the ads in newspapers.  These were generally discarded after the lead pouring.  So this mat is extremely rare.”  It looks like they are made of fine grained paper (heavier than cardstock) with some sort of coating.

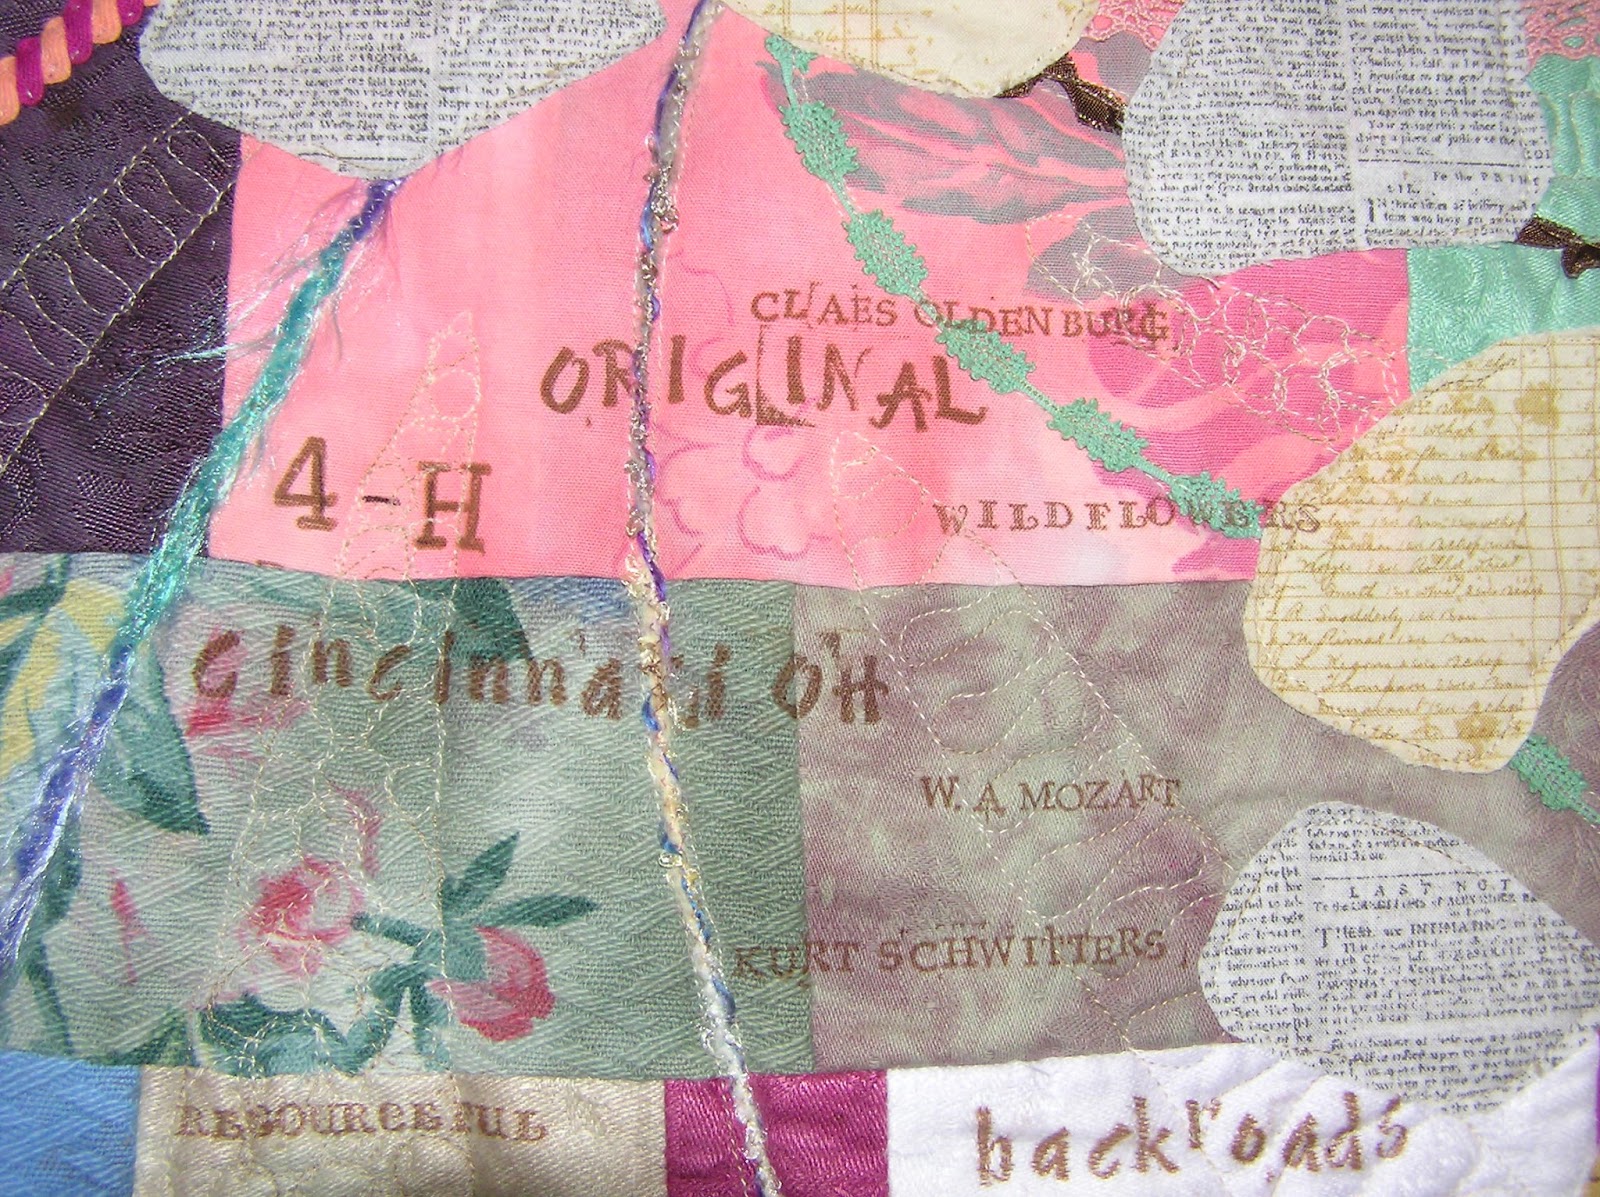
I am happy to report that they make great rubbings on fabric:
Image copyright RPS, please do not pin or re-post


They work decently with paper, although the sections with finer detail do not turn out as well.  These open up so many creative possibilities in my collage explorations.  I will have some of the ad sheets for sale at upcoming quilt shows, and I will list a few on my Etsy store in the next week. 

Friday, August 19, 2016

Collage in Progress


A day late, here is one of many ways to create something original out of fabric.   

I do not usually start with a finished vision.  I pick out a fabric or two, or a large embellishing item, and build a collage from there.  While ironing the vintage fabric scraps that I purchased last weekend, two pieces caught my eye – an odd bird shaped piece and a little hexagon.  These two pieces are the foundation of this evolving piece.  I selected a purple dyed damask napkin for the base, and started playing with the layout of other fabric pieces. 
Image copyright RPS, please do not repost elsewhere

I next selected two long, light colored calico pieces for some contrast of value.  Creating a skewed L shape in an arrangement is a recurring design device that has gotten stuck in my brain from a workshop that I took a few years ago.  I keep using it, as it creates a sort of half frame that keeps the viewer’s eye moving around the whole piece – something that you want in a good composition.     
Image copyright RPS, please do not repost elsewhere

Adding more pieces, I deliberately have no focal point here.  I’m not trying to recreate a concrete image.  These collages are meditative studies of texture, color, pattern and shape.  I want my viewer to have something to gaze upon that is a delight to the eyes. 

When playing with collage arrangements, take a picture of each one.  Seeing a smaller image of a composition often helps you evaluate it better.  Make one arrangement, snap a photo, take all the pieces off, start over.  However, set a time limit, otherwise you could spend days on one piece.  You want to create a finished work, move along with it!  Give yourself an hour to play, then look at your photos and pick one to make.  Rebuild the one you like, and start stitching.
Image copyright RPS, please do not repost elsewhere
A different look, though I'm not liking it as much as the first one.  See how different a collage can become by rearranging the pieces and adding or leaving out things?
Image copyright RPS, please do not repost elsewhere
Ugh, too much going on!  After adding pieces, this one really is not working.  I still will add stitching, fancy yarns, paper and who-knows-what else.  The little details will be too much for this option.  Next time, I'll have a few more design possibilities on a smaller napkin background.

Tuesday, August 16, 2016

Coshocton Wrap-up


The Coshocton Canal Quilters show is in the books.  I sold a little, bought a little, met some new faces, and discovered a great local pizza place.  Should you find yourself in Coshocton, Ohio, whether it is to visit Roscoe Village, or for something else, I recommend Crowtown Pizza on Second Street.  If you are reading this blog for the first time after finding me at the Coshocton show, welcome to my world of ramblings!  If you bought something from me, thank you.  I’d love to see what you make from my fabric.
 
I often have people tell me, whether it is referring to art quilts in general or the unusual textiles that I sell, that they like what they see but don’t know where to start in making something unique.  There are many ways to address the “blank page” challenge.  One quick way to get started is to pick out three or four fabrics that you like, cut a few simple shapes from them, and start playing with different arrangements.  Decide on a finished size, keep it small, and when you get an arrangement you like, start sewing.   

As I mentioned in the opening of this post, I bought a few things over the weekend including some neat vintage quilt blocks and fabric scraps.  I have enough fabric to work with already, but these vintage treasures kept calling me.  I’m inspired to create something with them. 
 

In the next post (hopefully on Thursday), I will give an example of the playing with shapes method of starting a composition. 

Thursday, August 11, 2016

What to do with a Hand Dyed Napkin


If you are in Central Ohio, I hope that you can make it out this weekend to the Coshocton Canal Quilters show at the Coshocton Presbyterian Church, North Fourth and Chestnut Street, Coshocton, Ohio.  Admission is $5, hours are 10-6 Friday and Saturday, noon to 3 on Sunday.  I will be selling all sorts of lovely hand dyed fabrics, embellishing fibers, dyed vintage doilies and fancy pieces, and other vintage goodies. 

I have three suitcases full of dyed damask napkins; here are some ideas for using them.


1. Cut them!  Use as you would any off the bolt fabric.  I recommend fusing a lightweight stabilizer to the back before cutting.  Most of the damasks really don't have a "wrong" side, they look great from either side.

2. Use as a base for an applique design.  The damasks work great with wool applique too.

3. Make a fabric collage using a damask napkin for a base.  Make several napkin collages and join them together into a larger wall hanging.

4. Make useful kitchen items from them: place mats, mug rugs, table runners, appliance covers, etc.

5. Make purses and bags from them.

6. Make a quilt - any size!  They combine beautifully with commercial prints and quilting enhances the damask. 

Unfortunately, my hand dyed damask napkins are not available on my Etsy store, you'll have to come see me at a show or find them at Silk Road Textiles in Cincinnati.  I'm working on a couple more retail sources where they will be available.

Thursday, June 30, 2016

Collectible Textiles

For a few years now, I have been working on a freelance art history project that necessitates looking through a major city's  newspaper page-by-page (the papers are not indexed by subject).  One of the perks of this project is finding pieces of other puzzles along with what I am supposed to be searching for. 

Over the past few years I have bought a few of these:


They are printed cotton flannel, and they were given away with packs of cigarettes.  That was all I could glean from price tags at antiques shops and markets.  Thanks to an accidental research find, I now know a bit more about them.  I recently found ads for these flags in the 1913 Cincinnati Times-Star.  Mecca brand cigarettes offered the flags as premiums, and Omar brand offered printed flannel Navajo blanket designs, like the one in the lower left here:


The ads were quite large, taking up one quarter to one third of a newspaper page.  I cannot confirm if 1913 was the earliest appearance of these flannels (also called "felts" by antiques dealers).  Later on, I noticed that on April 1, 1914, Cairo cigarettes was promoting two flags with each 5 cent package; "One packed regularly in Cairo and an extra blanket given with each package for a few days only.  Flags of all nations in brilliant colors."  This ad also noted that the flags measured 5 1/2 X 8 1/4."  In the May 6, 1914 Times-Star, an ad appeared for a "Free 8 X12 [inch] American Flag Blanket with a 10c oval package of MECCA cigarettes."  On May 20, 1914, also in the Times-Star, another ad touted, "Beautiful National Flag Blankets are packed with Egyptienne STRAIGHTS." 

These flags were made quite cheaply.  I have found that most of them have faded over the decades, and almost all of the ones in my collection show varying degrees of dye bleeding, especially the red dye.  I have seen a couple of quilts made from the national flags flannels.  Since smoking was nearly taboo for women at the time, it is fascinating that the premiums for a men's product were targeted to women for sewing projects!  I think that the concept of a series of small items given away in cigarette packs goes back earlier than 1913.  Small cards with various printed subject series (military ships, sports, colleges, etc.) can be found.  Harder to find are the silks:


I've only been able to secure these two.  These silks were sometimes stitched into crazy quilts.  I'd like to look into crazy quilts that have dates stitched into them and include cigarette silks.  That would give a fairly good indication of when the silks were made.  However, that is a project for some other time.