Showing posts with label mixed media. Show all posts

Tuesday, October 2, 2018

World War I Poppies - Finished!

Here it is, my own mixed collage interpretation of the World War I poppies:
Image and design copyright RPS

Here is a detail of the letter:
Image and design copyright RPS

The letter is actually a note on a postcard (copied onto fabric) that came with one of those wonderful scrapbooks that I found earlier this year.  There is no doubt that they came from a local family.  The postcard is a double length one:


The sender was apparently training at Camp Sherman in Chillicothe, Ohio.  The card is postmarked August 22, 1918 to a resident of Quaker City, Ohio.  Judging from the message, it was before the devastating influenza outbreak that occurred that year.  I wonder if the sender made it through the epidemic, and if he ever made it overseas.  The message reads:
        "Hello Rodney - How is the pike job coming?  We had some try out on Liberty trucks like they            take through there last Friday.  We will be driving trucks in France within a month from today if          we get over all OK.  We have a dandy pair of driving gloves & we get a Norfolk overcoat at the          port of embarkation wherever that will be we don't know.  But we can get a few shots of good              French wine, ha ha.


Tuesday, September 25, 2018

World War I Challenge Progress

Sadly, I am missing the entry deadline for this quilt, it is still not finished.  I'm not upset by missing the deadline, I will still finish the quilt and since I am going to be a vendor at the show it was to be entered into, I will have it on display (and for sale) in my booth.  I have a few more things to add to it, but here are a couple of detail images of the quilting and the very cool stamens in the poppies (hand stitched - straight stitches with French knots).  Enjoy!

images and design copyright RPS

This week is quieter than last, so I really have every intention of posting on Thursday... will it be about the finish of this quilt, or something else?

Tuesday, September 18, 2018

World War I Challenge

Yikes!  It has been a while since I posted here.  I have gotten wrapped up in  the World War I challenge piece that I mentioned previously.  The challenge is a poppy themed quilt, inspired by the poem, "In Flanders Fields."  Here are some in progress images:

First, my initial idea involved rubbings from gravestones in a nearby cemetery.  I only found a metal medallion indicating the grave of a World War I veteran.  In my collection of fabric collage stuff, I found a vintage hanky with some red poppies on it, and a felt tobacco premium flag  (Belgian flag, of course) from the World War I era.  I wanted those two items to be a part of the collage.
Image and design copyright RPS

Adding the flag and hanky would be the last steps in the collage, at this point I really needed some poppies.  I free-motion quilted the outlines of the flowers and leaves:
Image and design copyright RPS


Then, I colored the poppies with crayons, and heat set them by ironing.
Image and design copyright RPS


At this point, I wanted to add some detail with hand stitching, so I auditioned the flag and hanky again, changing the planned locations for them.  I didn't want to hand stitch where the extra pieces would cover my hard work.
Image and design copyright RPS

Check back on Thursday to see how the hand stitching and additional quilting turned out.

Thursday, June 14, 2018

Daily Challenges

Of course, sometimes just getting out of bed is a challenge, let alone realizing a dream, creating a masterpiece or changing the world!  Look to accomplish little things.  I have posted before about daily projects, and I have started several strings of daily projects over the past few years.  I have yet to finish any of them.  As I have said before, if you get bogged down and break a daily sequence, just pick it up again whenever you can.

I am returning to an artist trading card a day project that I made up for myself.  It was supposed to run for one year, 365 cards.   I have been working in it for five years now!  I have finished January through May.  Here are most of the pieces for June and July:


It is June again, so time for me to pick up the project again.  Will I finish the rest of the project this year?  Time will tell.

Last year, I discovered a great website about art journaling, DaisyYellow and a two month challenge out on the site each year - the index-card-a-day challenge.  I started the challenge last year, and did not get very far:


I enjoyed the concept and I love the cards I made.  I lost the self discipline to keep going to the end. Now, I am rolling along with this year's challenge:

I fully intend to pick up and complete last year's remaining index cards (most of them!) after I get through the ones for this year.


Wednesday, February 28, 2018

A Little Progress

Aside from spring planting and fall harvest, nothing gets me off track more than packing for a quilt show.  I have not accomplished much on the samples for the demos I will be doing this weekend, but I have enough done to show the samples.
Image and design copyright RPS
This is part of a collage that I am doing on a vintage tea towel.  Take a look at the feather stitch I used to stitch a length of silk sari ribbon around a square cut from a vintage hankie.

Image and design copyright RPS
This is a bigger view of the above detail.  The piece above the hankie is a mini collage that I started as another project that stalled, so it is going into this tea towel creation.  I am feeding my fascination with layers upon layers with this piece.

Not my stitching here!  This was the stitching on the tea towel when I rescued it in an auction box lot.

Finally, a little stitching I managed to finish on one of the collages that I will be talking about in Lebanon, Ohio this weekend.

Thursday, February 8, 2018

Quilt Show Announcement

I will be a vendor at the Lebanon (Ohio) Quilt and Fabric Arts Show, March 2-3, 10-5 each day.  Admission is $7, the event benefits the Warren County Historical Society.  It will be held at the Warren County Fairgrounds, 665 North Broadway, Lebanon, OH.  I will have my usual assortment of hand dyed fabrics, embellishing fibers, dyed vintage doilies, damask linens, fancy work and lots and lots of fancy hankies.  I will be giving a demonstration each day on how to use vintage pieces in fabric collage:
Image and design copyright RPS


Tuesday, January 2, 2018

Alphabet Soup

On December 21, I posted about vintage alphabet stamp sets, particularly one set that I was waiting to arrive that would hopefully replace an incomplete set.  Well, the set is not a match, it is nearly the same font, only larger!  Both sets are all capital letters, I wonder if there are lower case sets out there to go with them.  The new set will be great for larger art quilt projects, and I already like the idea of mixing fonts, even in a single word.  Maybe I will find a complete set of the smaller letters someday...

Anyway, I have been playing with the stamps, sponge brushing cheap acrylic paint on them.  Here you can see the two sizes of letters from the vintage sets:

I am going to keep going with my rubber stamp sets on this piece of muslin.  This will be another experiment with overlapping layers.  Check back on Thursday to see how the second layer went.

Thursday, December 21, 2017

One Dollar, Unlimited Inspiration

Not having learned traditional quilting means that I have no qualms about doing somewhat unorthodox things to fabric.  I have recently amassed a collection of new rubber stamps for my art journaling class supply base.  Why use them just on paper?  I have already used them on my "What's Your Story" challenge entry in the Mutton Hill Quilt Show:


Since I was stamping on the quilt after putting all three layers together, I had a lot of ink "over-slop."  The stamps sunk into the soft surface and left the excess ink that was picked up.  I probably over inked the stamps too, but everything remained legible.  I'm fine with that.


I am still adding to my collection of alphabet stamps, I just bought a vintage set of them at the local junk auction for $1. 


I should have sorted through them before the auction started, as a few letters are missing.  No problem, I could just mix fonts in a sort of ransom note style.  Then, there is always Ebay; I found a probably identical set of stamps, complete.  This second set is already on its way to me.  I will keep and use both sets, of course.

Tuesday, October 31, 2017

The Purple Collage, the Finale

Earlier this year, or maybe even last year, I periodically documented the creation of a fabric collage here.  It was finished for entry into the Mutton Hill Quilt Show, and here it is at the show:
Image and design copyright RPS

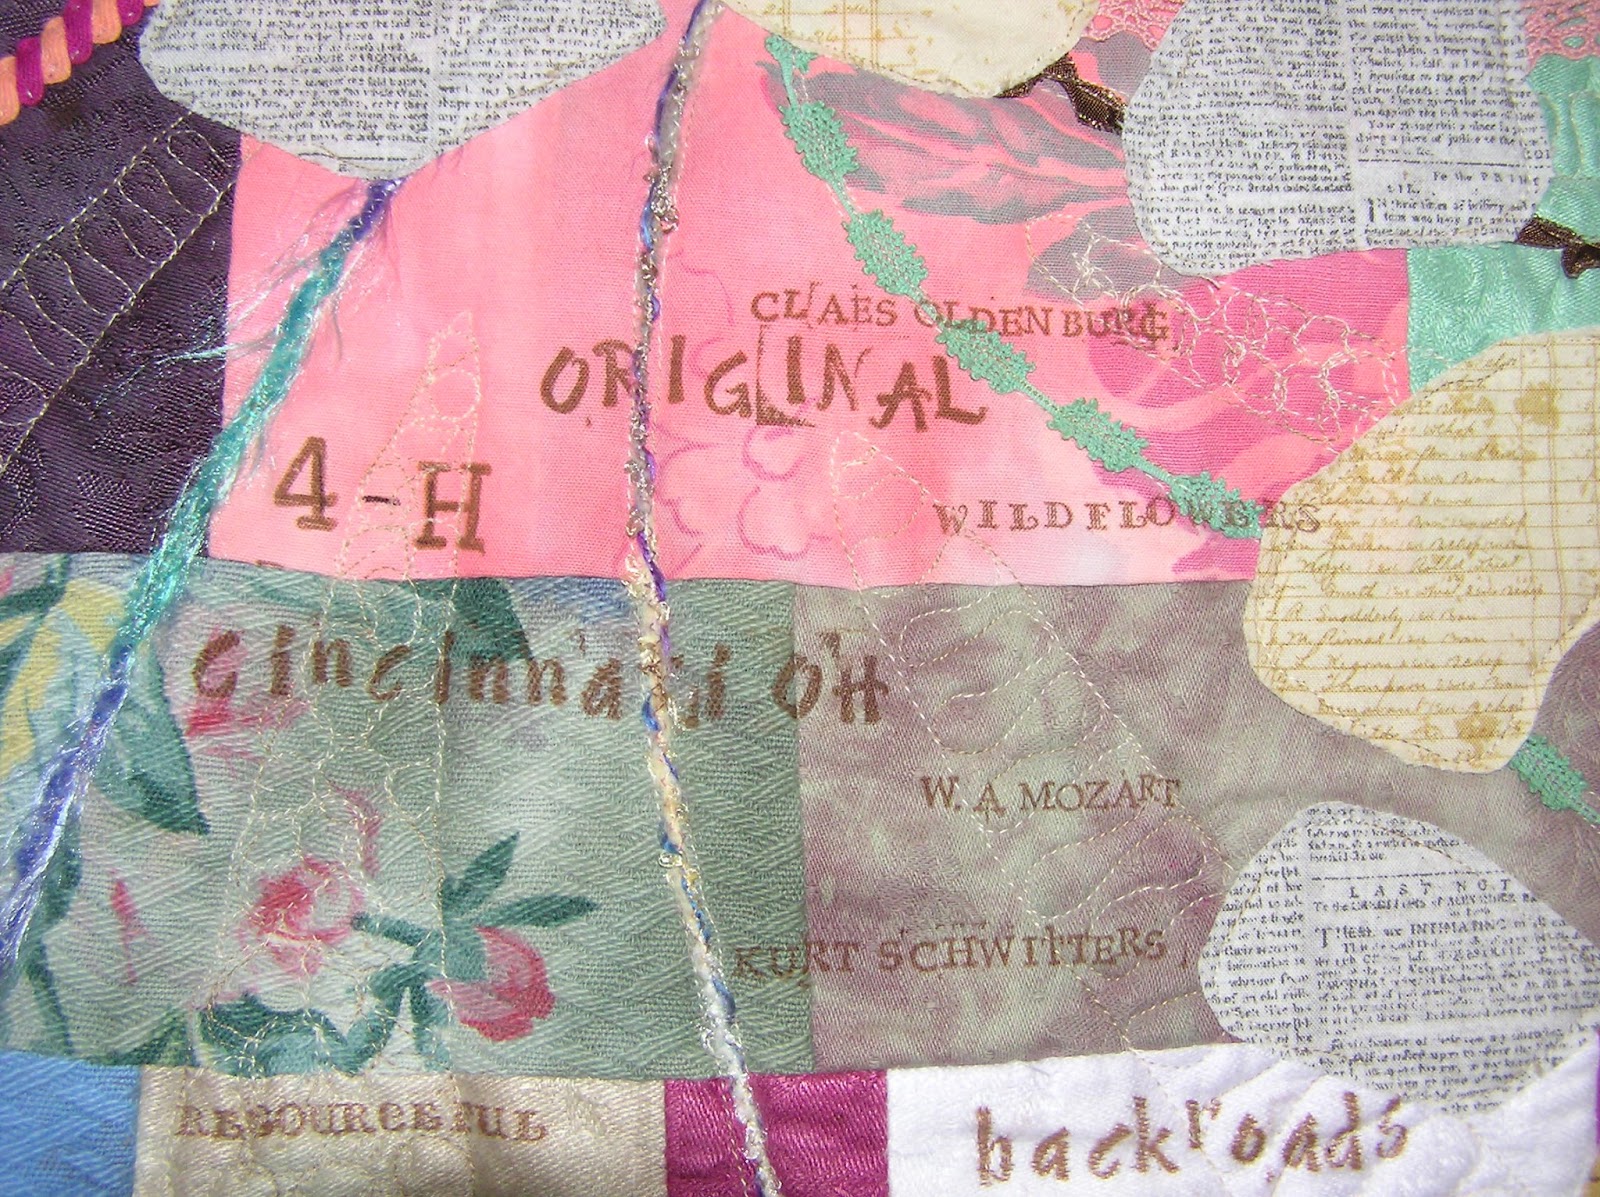
It was an experiment, not completely successful.  While I made it, I had in mind the paper collages of Kurt Schwitters (scroll down on the link for images of his work).  I think the influence of Schwitters is evident in my collage.  However, it is a bit of a wreck in the technique.  My most significant fault with my purple collage is the trial of sewing a slightly smaller quilt base, allowing the edges of the purple dyed damask napkin hang free.  I will not do that again!  It was hard to quilt near the edges, and I just don't like the floppy edges.  Additionally, the quilting made the whole thing lumpy!  The next collage that I make using a dyed napkin for a sub-base will have a slightly larger quilt base, not smaller.  I would like to try mounting future collages on canvas and stretcher bars, like a painting.  I have heard of other textile artists having good luck with that method, citing that would-be buyers relate to the treatment better. 

Another thing that I like about the collage is the seed stitching I did to create an unobtrusive border.  The stitching was necessary to try and secure the floppy edges, and it added more texture.  Not only is there paper sewn into this piece, but there really are pieces in there that would have been trash!  There are foil chocolate wrappers and plastic mesh produce bag pieces in the mix.  Look around as you go through your day with a vision to find unusual materials to stitch. 

Despite the problems, I really had fun making this and I still love it as a learning experience.  I will hang it somewhere in my house, as it is still a visual delight to me.  I hope to start my next collage this weekend.

Tuesday, October 24, 2017

Scrap Lace Fabric

I always draw a crowd when I demo my "scrap lace fabric" at quilt shows.  I had several request to re-post the instructions, so here they are.  These instructions are copyrighted, please do not re-post this elsewhere or distribute elsewhere.  


Here is something fun to make with strips of sheer fabric and funky yarns.  I came up with this after numerous utterances of “what do I do with this?” from shoppers in my quilt show/market booth.  I sell packages of assorted funky yarns, and many visitors to my booth love them, but get stumped on using them.  I also had to find a way to use a stash of beautiful vintage rayon scarves that were a surprise in a big box lot from a recent auction.  The technique is an expansion of thread lace from two sources: Fun with Sulky Blendables and Solid Color Cotton Threads, (Joyce Drexler/Sulky of America, 2011) and Fabric Embellishing: The Basics and Beyond (Ruth Chandler, Liz Kettle, Heather Thomas, Lauren Vleck, Landauer Publishing, 2009)
                                                                         
Supplies:                                          
2 pieces water soluble stabilizer (Sulky Solvy or Superior Threads Dissolve 4X), cut both pieces same size.
                HINT: Start small for the first try, about 10x10”
Assorted fancy yarns
Vintage scarf (rayon, polyester or silk)
Machine sewing thread to complement your color scheme

Here’s what you do:
1. Thread your sewing machine, set for free motion quilting
2. Cut narrow strips of scarf, roughly 1” wide, doesn’t have to be exact, vary the widths if desired
3. Place one piece of water soluble stabilizer on your work surface
Place strips of scarf on top of stabilizer, some horizontal, some vertical, some diagonal.  You don’t have to cover the entire surface, some gaps are OK.  You are creating a rough grid pattern.
4. Add random cuts of yarns on the strips; straight lines, curves lines, whatever looks good to you.
Add some more strips of scarf, but don’t completely cover the yarns you just used.
5. When you are happy with your arrangement of strips and yarns, place the second piece of stabilizer on top, matching it with the bottom piece. 
6. Carefully take the resulting “sandwich” to your sewing machine.  The fibers will shift as you sew, so watch for areas that are bunching and thin them out as you go.
7. Start quilting in a straight line pattern to “baste” the stabilizer sandwich, making your lines about 2”apart.
8. Once you get the basting lines done, you will now free motion quilt the entire sandwich.  Pick a quilting pattern that will allow you to easily double back over your design.  The first one of these that I made, I used the pebble design, and I simply stitched each pebble twice as I went.  The idea is to make sure the stitching is absolutely secure.  The quilting could take a while, since you are essentially quilting twice.  I also found that the stabilizer is difficult to maneuver at first, but it gets better as you go along.  I actually had to grab a fistful of one side of my sandwich to help it along.  Just be exceptionally careful that you don’t jerk it and break the needle.

9. When you are done quilting, you get to soak away the stabilizer.  Follow the instructions for the product you are using.  Let it dry, then you are ready to use it an embellishment, or attach to a piece of cotton and piece it into your next project.
COPYRIGHT 2017 RAGS PAPER STITCHES

Friday, January 20, 2017

Learning a New Skill

There's nothing like learning a new art or craft skill to get oneself re-energized about being creative.  Yesterday, I had the opportunity to take a paper making class at a nearby art museum.  Here is the result:


The procedure was much simpler that I though it would be, and though I do need a few special pieces of equipment, I think I'd like to make some of my own paper once in a while.  I should be able to have a frame made easily, and I could use the screen off of the discarded patio door that is now part of a garden fence.  Everything else I need, I have around here somewhere.  The potential to have specific colors to match a project is a plus, and I am intrigued by adding plant matter to the pulp for visual texture.  I am already contemplating how to dye the paper pulp with the powder dyes and plant dyes that I use.

The paper is still not dry, but I think I will have no problem sewing through it.  I've already played with adding paper to my fabric collages, and these pieces are destined for future sewing projects.

Wednesday, January 18, 2017

Scrapbooks and Ephemera, Conclusion

Hopefully, I have enlightened my readers about two fascinating collectors, Theodore Langstroth and Joseph Cornell.  I have good reasons for spending so much time on them in this textile art blog.  First, the odd subject-specific scrapbooks and dossiers are perfect illustrations of how one can find creative inspiration just about anywhere.  If you are looking for ideas, consider things that you love and look at what you have chosen to surround yourself with at home.  Make a list of people, living or not, whom you would find interesting to meet.  What countries fascinate you, what regions of your own country interest you?  What is your town known for?  What has been forgotten about it that people might want to know?  What mundane objects in your life deserve more attention?
Memories of past road trips, before interstates.  There is an art quilt idea here...

I know that not everyone is a collector of stuff.  Many of us want to get rid of stuff.  This leads to another reason why I profiled Langstroth and Cornell.  I'm beginning to believe that a good bit of what we throw in the trash, someone might be in need or want of elsewhere.  I am constantly amazed at the prices some people pay for things at the junk auction that I would have tossed out.  Yes, a lot of trash is just trash, but I wonder how much money gets thrown away each week in the way of objects that others would pay to have.  Not only am I thinking of the cultural heritage that is being thrown out, but potential aesthetic creation.  As I have described before, I use re-purposed vintage textiles in my dyeing and fabric collages.  I'm working on some craft workshop ideas where I work that will re-purpose select trash items, so this whole theme is on my mind quite a bit.  I could go on and on with this, but I should work on securing some compact discs that no longer play.

Tuesday, January 10, 2017

Scrapbooks and Ephemera, Part Three

Information on Cornell from: Joseph Cornell/Marcel Duchamp… In Resonance, Menil Foundation, Houston, TX, 1998.

Joseph Cornell (1903-1972), having no formal art training, could be considered an outsider artist.  He produced three dimensional mixed media collages that were encased in wooden boxes (usually glass fronted).  During his active years as an artist, he found success in the Dada and Surrealism movements beginning in the 1930s, and collaborated with Marcel Duchamp, among other elite art world associations.  I’ll admit to being strongly influenced not only by Cornell’s collage/assemblage artwork, but also by his vast collections of ephemera.  Check out some of his artwork here and here, and read on.

Cornell amassed quantities of images, printed matter and personal notes on numerous subjects of interest to him: 19th century advertising, ballet dancers, movie stars, literature, music, etc.  He referred to his subject collections as "dossiers."  Some of this material ended up in his collages, much of it did not, languishing in his home until being preserved as the Joseph Cornell Study Center at the National Museum of American Art (Washington DC).
One of my own Cornell-inspired dossiers

These personal collections assembled by Cornell were generated out of his own interests, probably not with any intent of them becoming a research source.  Cornell kept his ephemera collections relatively organized, but they were not pasted into scrapbooks, as the material was intended for use in collages.  In a way, the excess material and the finished collages themselves were scrapbooks in a different physical form. 

I started amassing my own files of notes, clippings and images before I ever knew of Cornell, but after discovering his collecting methods, I of course kept going.  I keep a limit on things, as I want to have a presentable living area!  Some of the things for which I have my own “dossiers” include: vintage sewing machine advertising, rare horse breeds, Euclid Beach Park, Route 66, and yes, even Joseph Cornell.


Next Tuesday, I’ll connect the dots on how Langstroth and Cornell relate to being more creative.  My next post on Thursday will return to the purple collage.

Thursday, November 3, 2016

Collage Continuation

Welcome back to the creation of my latest fabric collage.  I thought that I would sew more pieces down this afternoon, but I spent a lot of time thinking about what I wanted to do.  Some days are like that.  So far, all I have on the collage is flat fabric.  I want more texture in this.

I've had to rethink the attachment of the lacy trims and funky yarns that I love so much.  I don't want the ends unraveling, so I have to come up with a way of hiding the ends on a seamless base.  The obvious solution is to hide the ends under the fabric pieces that I will raw-edge applique to the base.


I don't want every trim end to start and end underneath fabric.  This is a design element, to vary what I do with a particular material, adding visual interest.  To avoid the unraveling of crocheted trim, I simply will fold under 1/4" of the ends that I don't hide under fabric.  

On this piece, I decided where I wanted the trim piece, and flipped it back to sew it as a short seam.  After trimming the first stitching line, I put the trim back in place and sewed the top edge.  The other end will be hidden under a fabric scrap:

Another consideration in design is to use a specific element in more than one place in a piece.  Keeping this in mind, I cut another piece of the light green trim to try sewing it by tucking under both ends and not hiding them under fabric.

Success!  It might be easier to sew the ends under by hand, or fuse with bits of Mistyfuse, then sew.  Sewing this piece by machine wasn't too bad.

 Onward with the trim!  I also will add some silk sari "ribbons" with this technique over the next few days.  On Tuesday, I plan on discussing machine couching.  For now, I have sewing to do...

Tuesday, September 6, 2016

More Auction Treasures

If you are looking for creative inspiration, there is so much in your own community.  This past weekend for me was chock full of local history.  I attended an estate sale and an estate auction and came away with more knowledge of the area I now call home and some great future art project ideas. 
                                      
The first sale yielded a small collection of gravestone rubbing how-to books and supplies, among other items.  Old cemeteries are a great source for local history and genealogy, and potential places to observe folk art stone carving.  I have already been well acquainted with incorporating gravestone carving into my own art, first in ceramics, and now making crayon rubbings on fabric.  This is a printed vintage tablecloth, pulled out of the weekly junk auction, covered in a collage of gravestone rubbings:
Image copyright RPS, please do not pin or re-post

The auction was the estate of a couple who had printed the town newspaper for decades.  There were a few rare local history books; I was soundly outbid on one lot of the books, but I bought the second lot, and I am dutifully studying them.  Half of the auction was the contents of the house, the other half was the bulk of the printing items.  The newspaper was apparently printed in a shed at the back of the property.  A calendar from 1974 in the shed had a note on December 26 that read, “Last day of Home Towner.”  After the printing of that last newspaper, the owner must have locked the shed and left it.  I bought a boxful of copies of two local history booklets that had been printed there and were authored by the couple.  There were lots and lots of old metal printing blocks for advertising, all of them went out of my price range.  I would have liked to get a few for display and to have something from this piece of area history.  I didn’t want to bid too much on them, as the metal plates were too shallow to use for rubbings, and I don’t want to get into messy printing inks.  I’m more interested in things that I can use rather than just look at these days.

There were several boxes of 9 X 12” sheets of embossed advertising graphics.  They were embossed in a positive orientation, which made them good for rubbings, if the fine detail could be captured.
Image copyright RPS, please do not pin or re-post


 I decided to take a chance on them.  Luckily, no one else wanted them, I and have two large boxes full of the sheets and a boxful of the monthly catalogs for the ad sheets from the manufacturer.  The ad sheets I now have are from the mid to late 1960s.

I have not been able to find much about these ad sheets.  All I have found so far is from an Ebay listing  from seller BenningtonBargains: “In the days of hot type, advertisers would send these mats to newspapers who would pour lead into them and then use the lead plate on presses to print the ads in newspapers.  These were generally discarded after the lead pouring.  So this mat is extremely rare.”  It looks like they are made of fine grained paper (heavier than cardstock) with some sort of coating.

I am happy to report that they make great rubbings on fabric:
Image copyright RPS, please do not pin or re-post


They work decently with paper, although the sections with finer detail do not turn out as well.  These open up so many creative possibilities in my collage explorations.  I will have some of the ad sheets for sale at upcoming quilt shows, and I will list a few on my Etsy store in the next week. 

Thursday, April 21, 2016

More Fabric Flowers

I have been chipping away this week at various nearly-finished projects.  One of the projects has been a sample for a future class that I want to teach.  Part of the sample includes making dimensional flowers with Tyvek (the woven plastic house wrap stuff) and fabric.  The process of working with Tyvek is detailed in Fabric Embellishing: The Basics and Beyond (Ruth Chandler, Liz Kettle, Heather Thomas, Lauren Vleck, Landauer Publishing, 2009).  I'm not going to quote the entire process here, but here is one thing to do with the Tyvek - spring flowers!

It seems like every creative project has to go though on ugly stage, even this quick, simple flowers.  Here they are, cut out after free motion quilting:


Not very exciting at this point.  But, after heating the fabric and Tyvek "sandwiches," they turn into this:


Much more interesting, no?  I still have to add beads to the centers.  Some of my flowers looked horrible before the heat treatment, but the puckering hides a lot of problems.  There were a few flowers that I thought would be fine, but did not turn out well in the end, sometimes it is best not to try and predict the outcome, but keep on making and see what happens.


Thursday, November 20, 2014

Getting into the Holiday Spirit


Call me Scrooge, but I am just not into the Christmas holiday hoopla.  I haven’t been for a long time; it has been years since I set up a tree, and I’d rather not do the gift exchange.  I realize I am pretty much in my own little world on shunning the end of the year festivities.  Naturally, when I was asked a couple of weeks ago to make a few Christmas ornaments for Art Market 649, I was reluctant, but I recognized an opportunity to maybe sell a few and make a few dollars.  The first set was a disaster. 

It shows that I was not interested in them – I tried to save time by gluing the trim, and managed to leave glue fingerprints on the fabric and I sewed them on a machine that still needed some fine tuning and had a too small needle in it for the thread I used.  I started out making inchies that were double sided.  I wanted both sides to be presentable, as ornaments often twist and spin while hanging on a tree.  This was not my first attempt with inchies, so it was not like I was unfamiliar with handling small bits of sewing.  Most of my problem with this set of ornaments was my attempts to save time.  I have been thinking a lot of how much time I spend on a project in order to be able to ask a fair price, yet still be able to sell it.  However, I still have to be satisfied enough with the result to be able to put my name on it.

                I walked away from the ornaments for a few days, then decided I had to make something.  The second attempt was better. 


I cut rectangles out of Pellon 808 and base fabric, fusing the fabric to the Pellon.  I then tacked down scraps of paper and trim with a glue stick (just enough to keep the bits where I wanted them).  Next, I free motion quilted each rectangle.  On half of the pieces, I stitched a charm or button, then I paired up the rectangles, wrong sides together, tacking then with a spot of glue.  I tucked the ends of a loop of rick rack in one short end of the resulting sandwich and then zig zag stitched the edges.  They were very quick to make, and I am pleased with the result.  They really are a complete realization of my business name – scraps of repurposed vintage fabric, bits of paper, stitched together.  If they sell at Art Market 649, I might make more of them.