Showing posts with label funky yarn. Show all posts

Tuesday, October 24, 2017

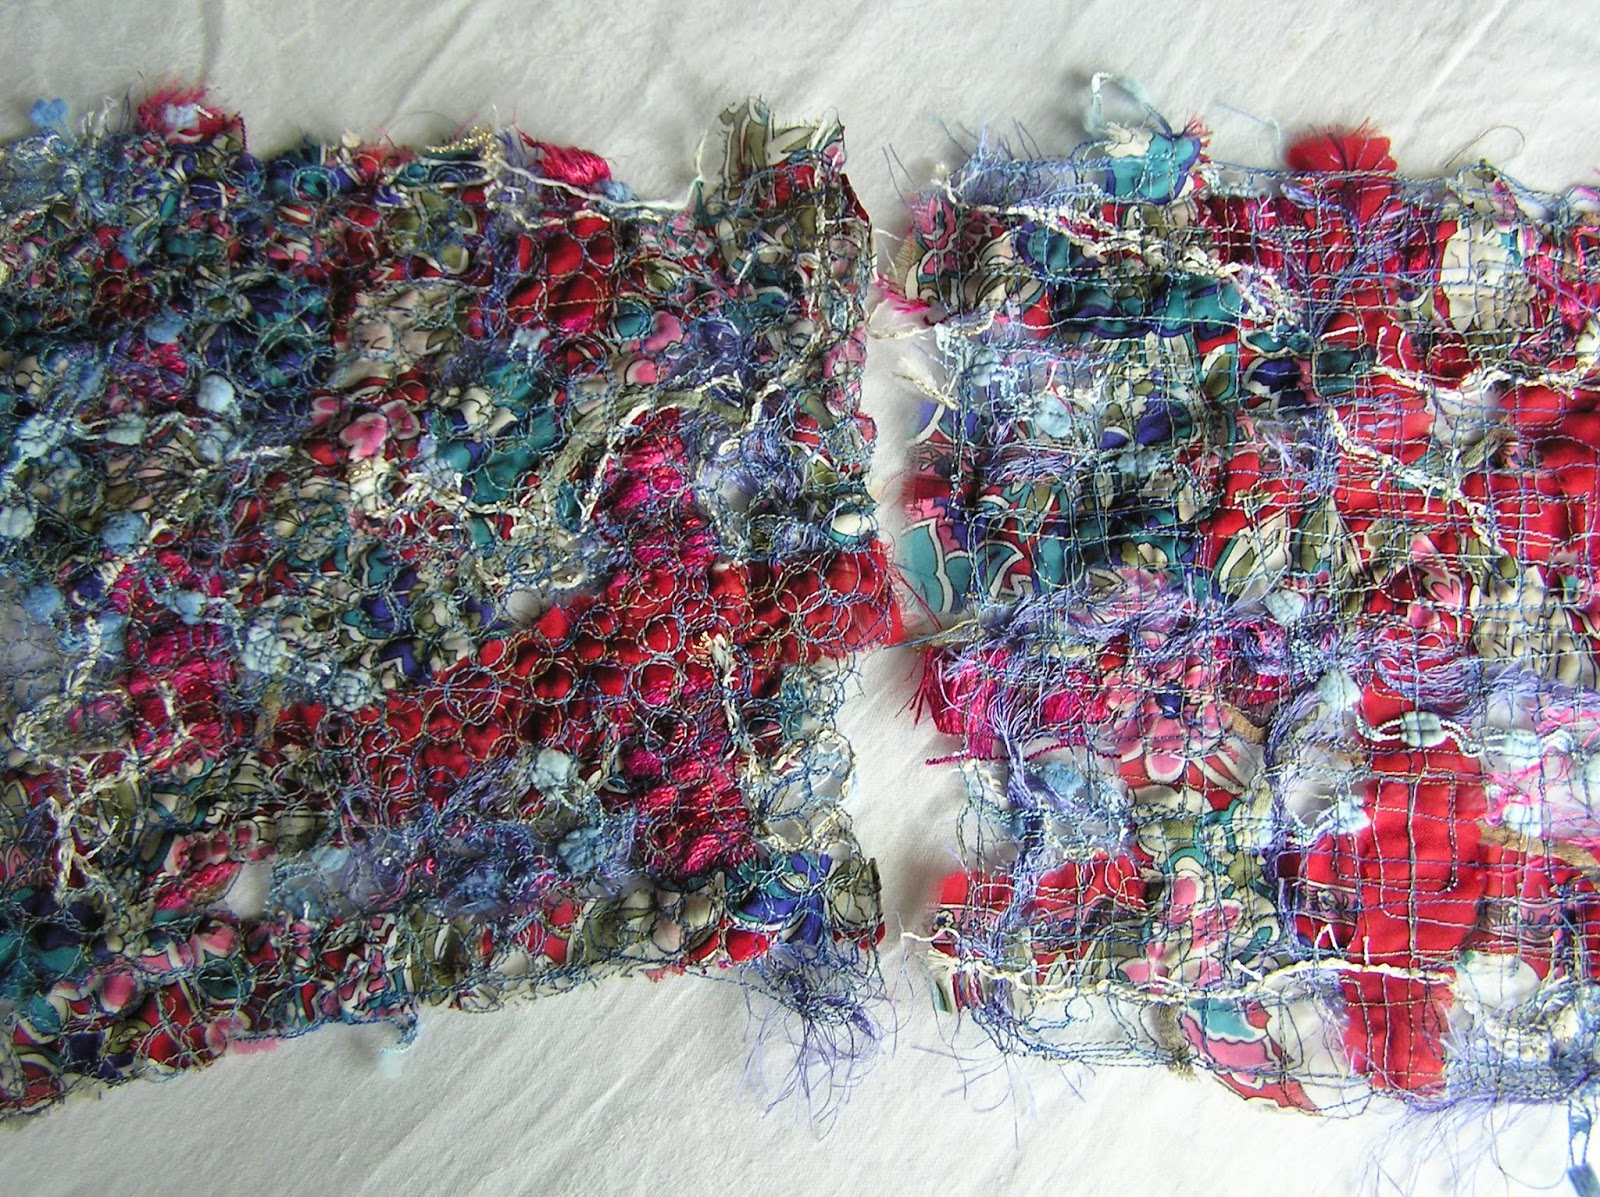
Scrap Lace Fabric

I always draw a crowd when I demo my "scrap lace fabric" at quilt shows.  I had several request to re-post the instructions, so here they are.  These instructions are copyrighted, please do not re-post this elsewhere or distribute elsewhere.  


Here is something fun to make with strips of sheer fabric and funky yarns.  I came up with this after numerous utterances of “what do I do with this?” from shoppers in my quilt show/market booth.  I sell packages of assorted funky yarns, and many visitors to my booth love them, but get stumped on using them.  I also had to find a way to use a stash of beautiful vintage rayon scarves that were a surprise in a big box lot from a recent auction.  The technique is an expansion of thread lace from two sources: Fun with Sulky Blendables and Solid Color Cotton Threads, (Joyce Drexler/Sulky of America, 2011) and Fabric Embellishing: The Basics and Beyond (Ruth Chandler, Liz Kettle, Heather Thomas, Lauren Vleck, Landauer Publishing, 2009)
                                                                         
Supplies:                                          
2 pieces water soluble stabilizer (Sulky Solvy or Superior Threads Dissolve 4X), cut both pieces same size.
                HINT: Start small for the first try, about 10x10”
Assorted fancy yarns
Vintage scarf (rayon, polyester or silk)
Machine sewing thread to complement your color scheme

Here’s what you do:
1. Thread your sewing machine, set for free motion quilting
2. Cut narrow strips of scarf, roughly 1” wide, doesn’t have to be exact, vary the widths if desired
3. Place one piece of water soluble stabilizer on your work surface
Place strips of scarf on top of stabilizer, some horizontal, some vertical, some diagonal.  You don’t have to cover the entire surface, some gaps are OK.  You are creating a rough grid pattern.
4. Add random cuts of yarns on the strips; straight lines, curves lines, whatever looks good to you.
Add some more strips of scarf, but don’t completely cover the yarns you just used.
5. When you are happy with your arrangement of strips and yarns, place the second piece of stabilizer on top, matching it with the bottom piece. 
6. Carefully take the resulting “sandwich” to your sewing machine.  The fibers will shift as you sew, so watch for areas that are bunching and thin them out as you go.
7. Start quilting in a straight line pattern to “baste” the stabilizer sandwich, making your lines about 2”apart.
8. Once you get the basting lines done, you will now free motion quilt the entire sandwich.  Pick a quilting pattern that will allow you to easily double back over your design.  The first one of these that I made, I used the pebble design, and I simply stitched each pebble twice as I went.  The idea is to make sure the stitching is absolutely secure.  The quilting could take a while, since you are essentially quilting twice.  I also found that the stabilizer is difficult to maneuver at first, but it gets better as you go along.  I actually had to grab a fistful of one side of my sandwich to help it along.  Just be exceptionally careful that you don’t jerk it and break the needle.

9. When you are done quilting, you get to soak away the stabilizer.  Follow the instructions for the product you are using.  Let it dry, then you are ready to use it an embellishment, or attach to a piece of cotton and piece it into your next project.
COPYRIGHT 2017 RAGS PAPER STITCHES

Thursday, January 12, 2017

That Purple Collage, Yet Again

If you get anything out of this ongoing series on this fabric collage, it is that art work usually does not happen overnight.  This is one factor in why good art is seemingly pricey.  This particular piece however, I'm not sure would fall into the category of good art, not yet, and maybe not ever!

I decided to add decorative stitching around the edges of the fabric pieces.  The first image below is a detail before I started the hand stitching, the next one is after.


The stitching adds a lot, doesn't it?  This pair of images is also a good illustration of how different lighting affects something.  The first image is in natural light, the second was taken with flash.

My next step is to join the collage to the three layer back, and quilt them together.  I am thinking ahead for once, and trying to decide how much more I should add to this collage.  I could add more fancy yarns:


How about more trim and some doilies?


I am going for a heavily textured creation, though I don't want to completely cover the lovely purple napkin that serves as the base.

Where will it end?  I don't know yet...

Thursday, November 17, 2016

Making Progress

Since my last post, I have sewn all the fabric pieces onto my collage-in-progress and I added more couched funky yarns.  Time to step back and evaluate it.  One way to see a work-in-progress a bit differently is to take a picture of it and make your evaluation from the picture.
image copyright RPS, please do not post elsewhere

Right away, I notice that the two dark purple lace pieces are aligned nearly the same way.  I like to have similar elements in a piece turned different ways.  I'm not going to rip one of them out, I will add another dark purple lace later, making sure to place it a perpendicular angle to the first two.  I've probably mentioned before, but it is a good idea to use each design element more than once in a piece.  I need to add one more of each of the purple laces, so this will be easy to fix.

Since I am using several different techniques in this collage, I like to keep switching back and forth in the application of them.  I'm not sewing all the fabric pieces at once, then the couching, etc.  Instead, I sew a couple of fabric pieces, couch a couple lines of yarn, add a lace trim, then back to fabric.  I'm not sure if it matters, but I would think that my back and forth method creates a more layered look.  Well, there's another future project to test my hypothesis...

Back to evaluating a work.  While I have a photo of the piece, I like to view the image in black and white too.  This allows me to see how I'm doing with contrast of value.
image copyright RPS, please do not post elsewhere

Clearly, I need to add some darker shades and some pale tints.  The fabrics, trims and yarns I have selected so far are too alike in value.  The same two lace pieces that are bothering me for the way I placed them are the only dark elements now.  It is important to have strong value contrasts to add more interest to a composition.  The background is a nice middle tone, most of the added pieces are about the same lighter value.  The more I look at this image, I think I might be OK if I add a few more dark pieces.  I have some work to do here!

Tuesday, November 8, 2016

Collage Project - Machine Couching

One of my specialty items at quilt shows is my small packs of embellishing fibers – assortments of funky yarns cut into manageable lengths for art quilts.  One way to use these funky yarns in a project is to machine couch them onto your quilt surface.

Set your machine for zig zag sewing.  Your stitch length and width will vary with the yarn that you choose.  On my vintage Singer 503A, I use the General Purpose foot.  Any open toe foot for your machine will work here, some machines have a couching foot.  The funky yarns won’t work in a foot that you have to thread with your couching cord.  Check the manual for your machine for specifics.

Place the yarn where you want it on your quilt top.  Here, I’ve pulled back a piece for fabric that is pinned for later sewing, and I am starting the length of yarn so that the end will be hidden under the fabric piece.  

I usually start by sewing a tack stitch, then slowly start zig zag stitching, keeping the yarn centered in the foot.  Watch your fingers!  Don’t try this if you are tired, or have other distractions happening in your sewing room.  I recommend having a toothpick or a chopstick that has been sanded to a point, so that you can safely guide the yarn as it feeds into the foot.  Yes, I learned all this the hard way!

This first yarn I selected is a flat one with a loopy flower at widely spaced intervals.  I decided to sew down several rows next to each other.  This is a good way to build up texture, use lengths of the same yarn, or use several different yarns.


Here, I am sewing a single strand of yarn to create a line that will draw the viewer’s eye around the collage.  I simply turn the fabric slowly as I sew to create a gently curving line.  

If you are using a yarn with loops in it, the loops will get caught in the prongs of the presser foot from time to time.  When that happens, stop, sew in reverse a couple stitches, slip off the loop, and use a toothpick to hold the loop down while sewing forward again.  Or, just cut the offending loop!  The loopy yarn is worth the extra effort, I like the way they look in my collages.

Couching is so easy, and you can do so many creative things with the technique.  Try using other decorative stitches to couch, just be sure the stitch won’t dominate the yarn.


Tuesday, August 30, 2016

Another Shop to Buy my Fabric!

I am pleased to announce that my hand dyed fabrics are now available in Southeast Ohio!  The Old Bank Mercantile has a small selection of my dyed vintage damask tablecloths and large napkins, some fat quarters and half yard cuts, creativity kits, embellishing yarns and dyed vintage fancy pieces (crocheted or embroidered items).  

The shop is located at 180 Broadway, Quaker City, Ohio; open Tuesday through Saturday.  Quaker City is not too far from the intersection of interstates 70 and 77, in the general vicinity of Cambridge and Salt Fork State Park.  If your travels take you to the region, please make a little side trip to check it out.  The shop is located in a 100-some year old bank building (could you tell from the name?).  The owners are still working on restoration, and have kept original fixtures when possible.  Their huge batting rolls are kept in the bank’s vault!  Stop by, support a local business, and support historic preservation.

Thursday, July 28, 2016

Adventures in the Bluegrass

My annual trip back to Lexington, Kentucky always leaves me completely spent, but as always, a good time was had.  The main purpose for the trip is BreyerFest, the convention for collectors of model horses.  Since I lived in Lexington for five years, there are places that I got to know that I must revisit.   

This year, I planned to spend half a day in the beautiful Lexington Cemetery.  I have been playing with making rubbings of interesting gravestone carvings with crayon on fabric.  On previous visits to the Lexington Cemetery, I discovered several graves that had long, profound poems carved into them.  Way back, I made some rubbings on paper of them that I now cannot find.  I want now to make some art quilts incorporating those poems.  Of course, I never wrote down the sections where those graves were located.
 
Even at 9 AM, it was awfully hot and humid.  I wandered through a couple a sections, and made a few uninspired rubbings.  One was a nice Celtic knot pattern:


I drove to another part of the cemetery, wandered a bit more, still not finding what I wanted.  By accident, I found the resting place of the notorious General John Hunt Morgan.  I have a tenuous connection to the Confederate general – I’m fairly certain that Morgan passed by the property I now live on during his brazen Ohio raid.  At this point, I realized that I would have to come back in cooler weather for the sole purpose of finding the graves I wanted.  I had thought that I would have a nice start to a new art quilt featuring gravestone rubbings, but not yet.   

Then it was on to another favorite Lexington spot, The Stitch Niche.  This is a nice yarn and cross stitch shop, but I do not knit, crochet, or cross stitch.  As I’ve indicated in other posts, I use all sorts of funky yarns as embellishments, and there are a variety of fancy threads marketed for cross stitch that are also great for hand sewn embroidery (think crazy quilts, Carol Ann Waugh’s Stupendous Stitches, etc.).  I have really gotten to love the varied lines put out by Rainbow Gallery, and the Stitch Niche has a small selection.  I think I bought at least one of each of the different lines that they had:


It is raining now, much needed.  Since I cannot attend to the garden, I will be trying out my new fancy threads.  I need to start a crazy quilt sample for the upcoming shows.

Tuesday, May 10, 2016

What is a Creative Kit?


As an itinerant vendor in a heavily saturated market (quilting and sewing expos), I am constantly thinking of ways to package fabric and notions that stand out from the crowd.  One of my more popular brainstorms is the Creative Kit.  These “kits” are each one of a kind assemblages of hand dyed fabric, lace trims, fancy yarns and dyed vintage doilies.  The contents vary in amount, but an average kit contains three small cuts of fabric (12" to 20" length & width), three or four cuts of trim (10” to 18” each), three or four yarns (one to six yards in length each) and two or three doilies or other vintage fancy work textiles.   
 

I’ve been pleased with the initial reception of the kits, sales have been steady.  However, for every person that buys one, three more ask, “what do you do with this?” I’ve been explaining them as started kits for small art quilts and crazy quilts, but don’t stop there!  Use them for fiber art dolls.  Use them to embellish… anything – baskets, clothing, bags, purses, and hats, whatever it is that you stitch through.  Make fabric collages, postcards, bookmarks, artist trading cards.  Add the trims into pintucks, couch the fancy yarns with decorative threads.  Cut small designs out of the doilies and add them as textural design elements into an applique quilt.  Add a Creative Kit into the fabrics for a wall hanging kit and make it unique.
 

There are a few of my Creative Kits on my Etsy site (click on the link to the right).  Later this summer, I will probably not be putting the doilies in them.  I have not decided what will replace the doilies, but they will soon only be available by the piece at the shows I will attend, not online.  It is getting difficult to find the vintage doilies at a reasonable price.  If you like the kits with the doilies, grab them now!

Thursday, March 24, 2016

More on pin looms

A short post today, as I have killed a lot of time this afternoon looking for more vintage pin looms online and exploring a nicely done site about them, Eloomanation. 

The book I mentioned in my last post is Pin Loom Weaving by Margaret Stump (Stackpole Books, 2014).  Most of the pin loom projects out there are a little too... dull (for lack of a softer term) for me, too much in the kitschy craft realm.  Of course, I don't like knitted sweaters, so I guess I come into this with a bias.  I want to twist these little pin loom squares into something unusual and unexpected.  I'm working on making some flowers with them to go with a larger project in the works.  Speaking of that project, I really should get back to work on it.  Next time, the start of an extensive series on who and what has influenced my art ideas.

Tuesday, March 22, 2016

Pinning Down Pin Looms

Last week, I had to make a seven hour round trip in one day to pick up three pieces of my artwork, not exactly something I was all that happy about.  It is a trip I make on occasion, but I usually make the trip a several day visit, not just for business, but for friends as well.  There is an antiques mall at the halfway point between the two points that made my journey.  It is a perfect time to get out and stretch, and hopefully find something for my varied collections.  On my journey last week, halfway down the first row of showcases, I find this:


A set of vintage Weave-It pin looms!  One four inch square and one two inch square, in the original box, with the original needles.  No instructions, but I have a modern Zoom Loom that is nearly identical in design.  This little treasure made the long day worth while.  I certainly don't need anymore distractions from the various half finished projects that I have going, but I have of course been playing with my new "toys."


I had no problems using the Zoom Loom instructions on the vintage looms.  The two small squares in the upper left corner were done with Valdani #8 cotton, the rest with assorted fancy yarns.  Somewhere, I have a book on pin loom weaving, I need to find it.  More on that next time...

Tuesday, December 1, 2015

Fun project: "Lace" from funky yarn and fabric strips


Here is something fun to make with strips of sheer fabric and funky yarns.  I came up with this after numerous utterances of “what do I do with this?” from shoppers in my quilt show/market booth.  I sell packages of assorted funky yarns, and many visitors to my booth love them, but get stumped on using them.  I also had to find a way to use a stash of beautiful vintage rayon scarves that were a surprise in a big box lot from a recent auction.  The technique is an expansion of thread lace from two sources: Fun with Sulky Blendables and Solid Color Cotton Threads, (Joyce Drexler/Sulky of America, 2011) and Fabric Embellishing: The Basics and Beyond (Ruth Chandler, Liz Kettle, Heather Thomas, Lauren Vleck, Landauer Publishing, 2009)


Supplies:

2 pieces water soluble stabilizer (Sulky Solvy or Superior Threads Dissolve 4X), cut both pieces same size.

                HINT: Start small for the first try, about 10x10”

Assorted fancy yarns

Vintage scarf (rayon, polyester or silk)

Machine sewing thread to complement your color scheme


Here’s what you do:

1. Thread your sewing machine, set for free motion quilting

2. Cut narrow strips of scarf, roughly 1” wide, doesn’t have to be exact, vary the widths if desired

3. Place one piece of water soluble stabilizer on your work surface

Place strips of scarf on top of stabilizer, some horizontal, some vertical, some diagonal.  You don’t have to cover the entire surface, some gaps are OK.  You are creating a rough grid pattern.

4. Add random cuts of yarns on the strips; straight lines, curves lines, whatever looks good to you.

Add some more strips of scarf, but don’t completely cover the yarns you just used.
 

5. When you are happy with your arrangement of strips and yarns, place the second piece of stabilizer on top, matching it with the bottom piece. 

6. Carefully take the resulting “sandwich” to your sewing machine.  The fibers will shift as you sew, so watch for areas that are bunching and thin them out as you go.

7. Start quilting in a straight line pattern to “baste” the stabilizer sandwich, making your lines about 2”apart.

8. Once you get the basting lines done, you will now free motion quilt the entire sandwich.  Pick a quilting pattern that will allow you to easily double back over your design.  The first one of these that I made, I used the pebble design, and I simply stitched each pebble twice as I went.  The idea is to make sure the stitching is absolutely secure.  The quilting could take a while, since you are essentially quilting twice.  I also found that the stabilizer is difficult to maneuver at first, but it gets better as you go along.  I actually had to grab a fistful of one side of my sandwich to help it along.  Just be exceptionally careful that you don’t jerk it and break the needle.

9. When you are done quilting, you get to soak away the stabilizer.  Follow the instructions for the product you are using.  Let it dry, then you are ready to use it an embellishment, or attach to a piece of cotton and piece it into your next project.