I have already fallen way behind on my goal this year to post on this blog twice a week! It finally snowed here enough to do some snow dyeing, and as that snow was melting, I discovered that half of what I dyed didn't "take" well at all. Luckily, the very next week, we got another round of snow, so I overdyed the first batch in the same color combinations. I am pleased with the results, finally:
This might be it for snow dyeing this season, the weather is going to be unseasonably warm, highs in the 50s next week, but winter is not over yet.
Next week, I will start posting a multi-part series based on a recent SAQA group discussion about labeling your artwork and leaving a legacy.
Friday, January 29, 2016
Thursday, January 7, 2016
Bolero
Bolero: n. 1. A lively Spanish dance in triple meter. 2. The music for this dance. 3. A waist-length jacket, with or without collar,
lapels and sleeves, worn open in front.
(Webster’s College Dictionary, Random House, 1995.)
I found this and one other bolero (the article of clothing) in
a big box lot of linens and doilies at a recent estate auction. I’m not sure if the estate was of a collector
or antiques dealer, I am guessing the latter, as there was not enough of any
one type of item to clearly establish a collection of that given group. Plus, nearly everything had a price tag on
it. I troll the local estate auctions
for vintage linens and other things I can use in my fabric dyeing and art
quilts. My first thought on these
boleros was why would anyone make, buy or wear a lacy sort of jacket that not
only doesn’t cover the torso, but will do nothing to keep you warm? Lately, I dress more for comfort. After I thought about my gut reaction more, I
realized that I cannot recall the last time I dressed up to go somewhere. There is an emotional benefit to getting “dolled
up,” at least once in a while. Why not
make and wear something beautiful?
However, since I have a closet full of dressy clothes that I
obviously am not wearing, I have put the boleros up on my Etsy store. My creative brain wants to dye them and alter
them, but I think they might be worth keeping as they are. I will give someone who is into historical costuming
the chance to give them a new home.
I think that the last time I dressed up and went out was about
three years ago (that long, really?) to a fantastic orchestra performance of
Rodrigo’s Concierto de Aranjuez, with
Pepe Romero as the guest soloist. One of
many classical pieces I would like to hear live is Ravel's Bolero. Somewhere, I have
heard that Bolero is the longest
crescendo in classical music. There is a great video of the Cincinnati Symphony Orchestra performing Bolero on YouTube.
I have been contemplating interpreting music in my textile
art. Other than illustrating a few Tom
Waits songs, I have yet to come up with any solid ideas on transforming sound
into fabric in such a way that the viewer would relate to the music. I think that using music would be a good way
to teach visual design, there are similarities to both. In the case of Bolero, an short theme is repeated on the timpani s throughout the
piece, and the other instruments echo it, while a melody is repeated through
the instruments, solo or in groups; repetition, variety and unity – both important
tools in visual design too. This is definitely a concept I will be working on this year.
Tuesday, January 5, 2016
New Year's resolution
Indeed, it is time again for the making of resolutions to start or stop all sorts of activities. I don't have much readership of this little blog, but I am hoping that by putting my goals for the upcoming year out in the web, it will encourage me to keep them.
First, I want to post to this blog more than once a month. I'm planning on twice a week, and I've even scheduled time for it.
Second, I want to submit at least one art quilt to a show. This doesn't mean I will get accepted, the goal is just to get something finished and in front of a jury. I can't get into shows if I don't enter.
After that, the rest of my plans are simply trying to build this fabric arts business and keep surviving.
Next time (Thursday, perhaps), a bit about boleros - the article of clothing and the piece of music by Ravel.
First, I want to post to this blog more than once a month. I'm planning on twice a week, and I've even scheduled time for it.
Second, I want to submit at least one art quilt to a show. This doesn't mean I will get accepted, the goal is just to get something finished and in front of a jury. I can't get into shows if I don't enter.
After that, the rest of my plans are simply trying to build this fabric arts business and keep surviving.
Next time (Thursday, perhaps), a bit about boleros - the article of clothing and the piece of music by Ravel.
Tuesday, December 1, 2015
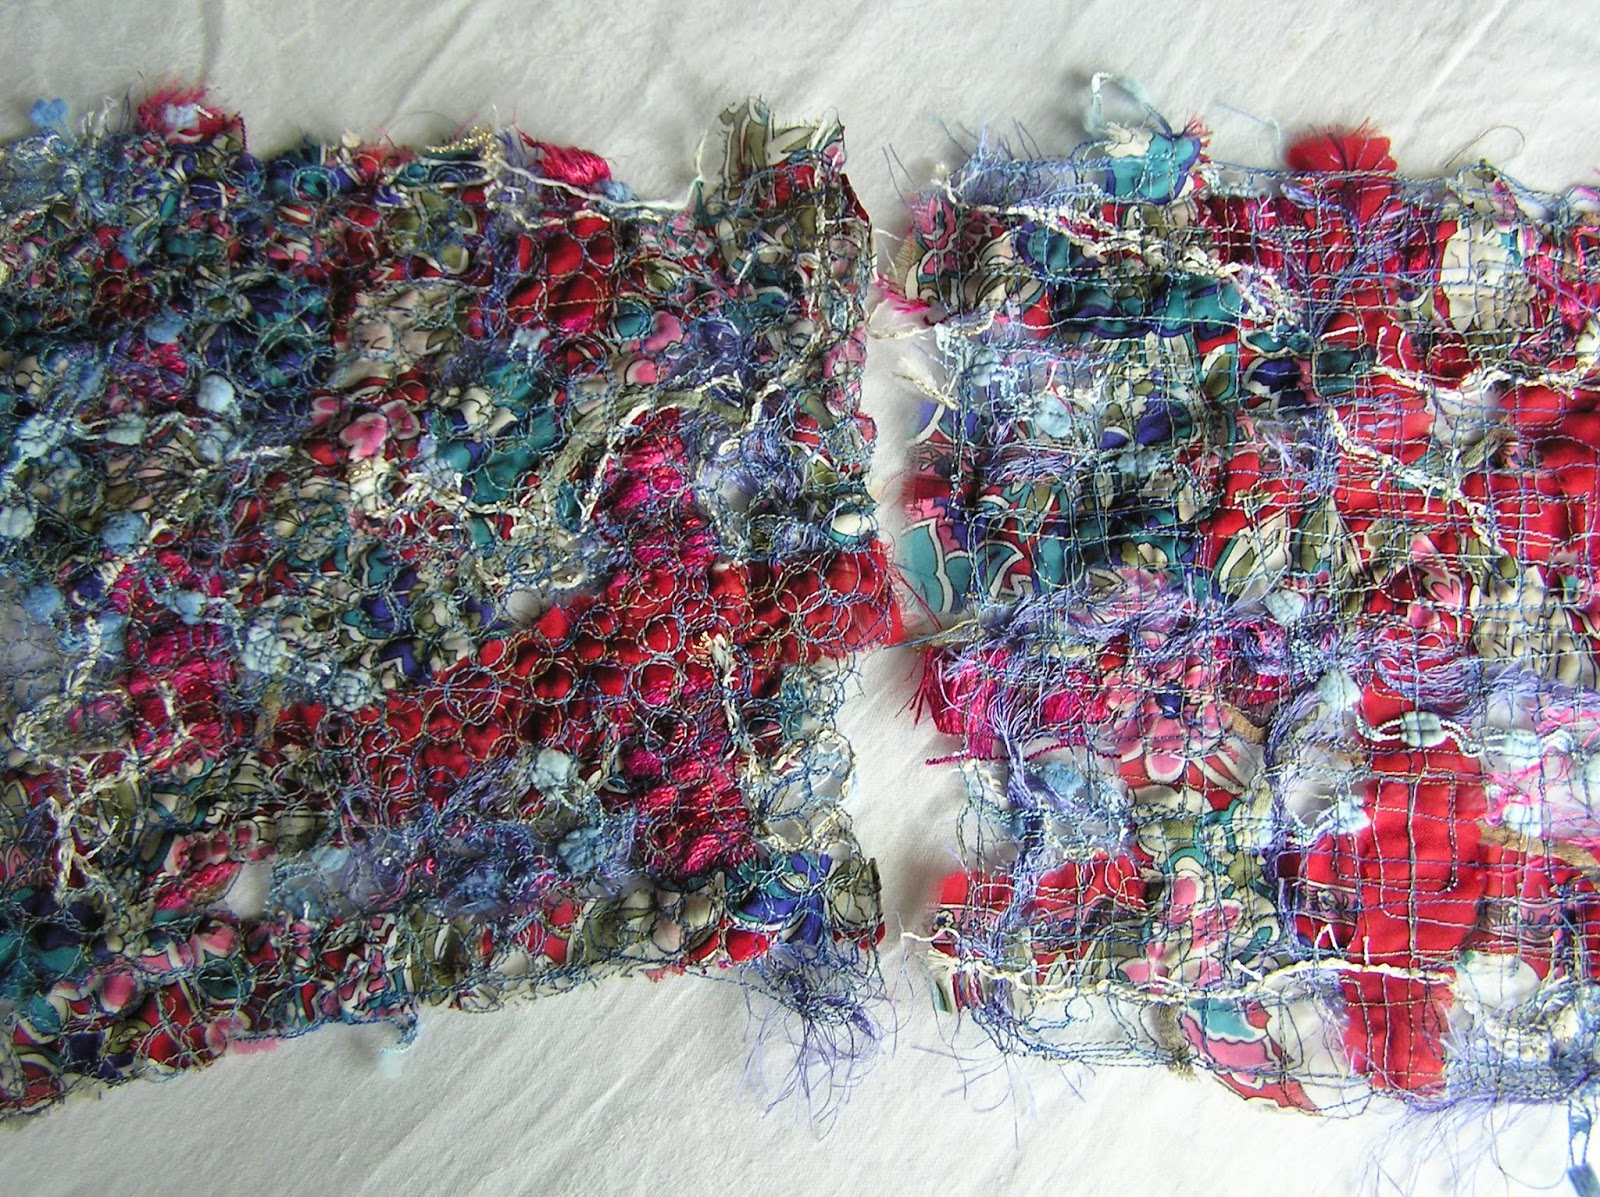
Fun project: "Lace" from funky yarn and fabric strips
Here is something fun to make with strips of sheer fabric
and funky yarns. I came up with this
after numerous utterances of “what do I do with this?” from shoppers in my
quilt show/market booth. I sell packages
of assorted funky yarns, and many visitors to my booth love them, but get
stumped on using them. I also had to
find a way to use a stash of beautiful vintage rayon scarves that were a
surprise in a big box lot from a recent auction. The technique is an expansion of thread lace
from two sources: Fun with Sulky Blendables and Solid Color Cotton Threads,
(Joyce Drexler/Sulky of America, 2011) and Fabric Embellishing: The Basics
and Beyond (Ruth Chandler, Liz Kettle, Heather Thomas, Lauren Vleck,
Landauer Publishing, 2009)
Supplies:
2 pieces water soluble stabilizer (Sulky Solvy or Superior
Threads Dissolve 4X), cut both pieces same size.
HINT:
Start small for the first try, about 10x10”
Assorted fancy yarns
Vintage scarf (rayon, polyester or silk)
Machine sewing thread to complement your color scheme
Here’s what you do:
1. Thread your sewing machine, set for free motion quilting
2. Cut narrow strips of scarf, roughly 1” wide, doesn’t have
to be exact, vary the widths if desired
3. Place one piece of water soluble stabilizer on your work
surface
Place strips of scarf on top of stabilizer, some horizontal,
some vertical, some diagonal. You don’t
have to cover the entire surface, some gaps are OK. You are creating a rough grid pattern.
4. Add random cuts of yarns on the strips; straight lines,
curves lines, whatever looks good to you.
Add some more strips of scarf, but don’t completely cover
the yarns you just used.
5. When you are happy with your arrangement of strips and
yarns, place the second piece of stabilizer on top, matching it with the bottom
piece.
6. Carefully take the resulting “sandwich” to your sewing
machine. The fibers will shift as you
sew, so watch for areas that are bunching and thin them out as you go.
7. Start quilting in a straight line pattern to “baste” the
stabilizer sandwich, making your lines about 2”apart.
8. Once you get the basting lines done, you will now free
motion quilt the entire sandwich. Pick a
quilting pattern that will allow you to easily double back over your
design. The first one of these that I
made, I used the pebble design, and I simply stitched each pebble twice as I
went. The idea is to make sure the
stitching is absolutely secure. The
quilting could take a while, since you are essentially quilting twice. I also found that the stabilizer is difficult
to maneuver at first, but it gets better as you go along. I actually had to grab a fistful of one side
of my sandwich to help it along. Just be
exceptionally careful that you don’t jerk it and break the needle.
9. When you are done quilting, you get to soak away the
stabilizer. Follow the instructions for
the product you are using. Let it dry,
then you are ready to use it an embellishment, or attach to a piece of cotton
and piece it into your next project.
Tuesday, October 13, 2015
Doily flowers
Here is another type of flower, made from a vintage doily (under 10" diameter).
1. Cut a length of hand sewing thread, thread your needle and knot it. I like to use 8 or 12 weight pearl cotton for the doilies.
2. With a long running stitch, sew a circle around the doily with a 1" or so radius from the center.
3. Don't overlap your first stitch, but when you get all the way around, take your thread to the backside of the doily.
4. Gently pull your thread with one hand while holding the doily in your other hand. The doily will gather and ruffle as you pull the thread, creating the flower shape. There will now be a small lump at the center of the flower, this is the back of the flower. Take a few whipstitches through the lump to secure the flower. Leave the thread end long to sew to a larger piece of fabric. That's it! So simple, a neat way to use old doilies. Use them to add dimension to Baltimore Album type quilts, crazy quilts, or your own unique art quilt bouquet.
1. Cut a length of hand sewing thread, thread your needle and knot it. I like to use 8 or 12 weight pearl cotton for the doilies.
2. With a long running stitch, sew a circle around the doily with a 1" or so radius from the center.
3. Don't overlap your first stitch, but when you get all the way around, take your thread to the backside of the doily.
4. Gently pull your thread with one hand while holding the doily in your other hand. The doily will gather and ruffle as you pull the thread, creating the flower shape. There will now be a small lump at the center of the flower, this is the back of the flower. Take a few whipstitches through the lump to secure the flower. Leave the thread end long to sew to a larger piece of fabric. That's it! So simple, a neat way to use old doilies. Use them to add dimension to Baltimore Album type quilts, crazy quilts, or your own unique art quilt bouquet.
Friday, October 9, 2015
Lace Flowers
This is one of the embellishment techniques I was demonstrating at the quilt show last weekend. It is very easy, and quick to do. All you need is a length of wide lace trim, sewing thread and needle. I include several cuts of dyed lace trim in my Creativity Kits, available on my Etsy shop.
1. Cut a length of lace trim, 7" to 12" long, cut a length of matching thread, thread your needle and knot.
2. Fold 1/4" of short end of lace to the backside, bring needle up through fold. Sew a long running stitch along the long flat side of your lace trim, as close to the edge as is reasonable. Be sure to catch the thread in the thicker parts of the lace.
3. When you reach the other short end of the lace, fold 1/4' of the end to the backside of your lace, sew through the fold.
4. Gently pull the thread with one hand while holding the lace with your other hand. The lace trim will pucker and ruffle, and curve back on itself until the two short ends meet. Sew the short ends together with a few whipstitches. Knot the thread in the trim, and leave your thread end long to sew onto a project.
Here's a view of the backsides of two flowers:
It might be a bit difficult to see, but I usually take a few running stitches to the outside of the flower after pulling the thread and whipstitching the center. This further secures the flower and looks neater.
1. Cut a length of lace trim, 7" to 12" long, cut a length of matching thread, thread your needle and knot.
2. Fold 1/4" of short end of lace to the backside, bring needle up through fold. Sew a long running stitch along the long flat side of your lace trim, as close to the edge as is reasonable. Be sure to catch the thread in the thicker parts of the lace.
3. When you reach the other short end of the lace, fold 1/4' of the end to the backside of your lace, sew through the fold.
4. Gently pull the thread with one hand while holding the lace with your other hand. The lace trim will pucker and ruffle, and curve back on itself until the two short ends meet. Sew the short ends together with a few whipstitches. Knot the thread in the trim, and leave your thread end long to sew onto a project.
Here's a view of the backsides of two flowers:
It might be a bit difficult to see, but I usually take a few running stitches to the outside of the flower after pulling the thread and whipstitching the center. This further secures the flower and looks neater.
Tuesday, October 6, 2015
Streetsboro Quilt Show
If you have found your way to my blog after meeting me at the Streetsboro Quilt Show, welcome! Thank you to those who made a purchase from me. The hand dyed fabric and related art quilting goodies are my livelihood now; I appreciate your support, and I'd love to see what you make with my fabric.
Over the next few weeks I will be posting instructions for various things you can do with the vintage and unusual products I sell: flowers from hankies or lace trim, machine sewn yarn "lace," and couching fancy yarns. Keep checking back. I am trying to get into the habit of posting on Tuesdays and Thursdays.
In my last post, I wrote about several plants I use as dyes, but I did not have an image for the dahlias. Over the weekend, I gathered a gorgeous bouquet of them from my mother's garden. Dahlias have been bred to an amazing array of colors and variances in flower and petal form. Some avid growers of them show their flowers at judged events with passion on the levels of horse and dog shows. We enjoy them at home, and when these blooms fade, their color will be captured in some silk that I have waiting.
We always need beautiful things to look at in a world full of people doing ugly things.
Over the next few weeks I will be posting instructions for various things you can do with the vintage and unusual products I sell: flowers from hankies or lace trim, machine sewn yarn "lace," and couching fancy yarns. Keep checking back. I am trying to get into the habit of posting on Tuesdays and Thursdays.
In my last post, I wrote about several plants I use as dyes, but I did not have an image for the dahlias. Over the weekend, I gathered a gorgeous bouquet of them from my mother's garden. Dahlias have been bred to an amazing array of colors and variances in flower and petal form. Some avid growers of them show their flowers at judged events with passion on the levels of horse and dog shows. We enjoy them at home, and when these blooms fade, their color will be captured in some silk that I have waiting.
We always need beautiful things to look at in a world full of people doing ugly things.
Subscribe to:
Posts (Atom)